I made a Toothless Halloween costume for my 4-year-old this year. I was worried about the visibility of an almost entirely black costume at night, so I added bits of reflective fabric.
Materials:
- Black fleece
- Red fleece
- White fleece
- Black zip up hoodie sweatshirt
- Silver reflective fabric (I used this.)
- Yellow reflective fabric (I used this.)
- Black Velcro
- Poly-Fil
- Batting
For most of the pattern pieces I used Choly Knight's free Night Fury Hoodie pattern pieces.
The eyes are made from two pieces of the yellow reflective fabric sewn together. Then black fabric for the pupil and a small bit of silver reflective fabric. I used Choly Knight's template for the eyes. I sewed this onto a black hoodie sweatshirt I bought at Target.
I then made two horns using Choly Knight's template, although I made them a little smaller. I didn't bother with the head spikes.
For the wings, I used Choly Knight's template, although I enlarged the wings for this costume. I added batting inside to give the wings a little more stiffness. For each wing, I cut out two pieces of black fleece and a piece of cotton batting.
I then sewed them together (except for the straight edge), turned them right side out, and topstitched around the edge of the wings as well as the veins.
I then sewed the wings together with a short segment of the back spikes from Choly Knight's template. By this point, all of the layers together were pretty thick, so I had to use my walking foot.
Using a walking foot, I sewed the straight edge of each wing to the back of the sweatshirt.
I then sewed the top of the wings to the sweatshirt along the existing topstitching.
The tail was based on this Dino Tail Tutorial.
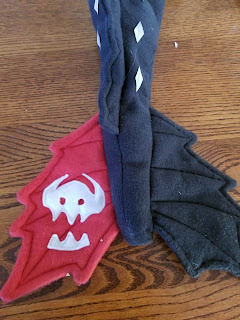
First I made the tail fins, one black and the other red. I adapted this for the shape of the fins. Each is made from two pieces of fleece and a piece of batting, like the wings. The three layers are sewn together, leaving the straight edge open for turning. I then topstitched around the edge of each fin, as well as the veins. Then I sewed on the skull logo.
I then made the side fins. This part I drafted myself. Again, each fin is made from two pieces of black fleece and a piece of batting. After sewing all but the straight edge together, the side fin is turned right side out, and then topstitched.
Instead of sewing two large triangles of fabric together for the tail, I used three pieces of fleece. I first followed the directions in Choly Knight's template to make the back spikes. I then sewed two triangles of fleece together with the back spikes between them in order to make the top surface of the tail.
I then cut a bunch of diamond-shaped pieces of the silver reflective fabric and sewed them onto the top surface of the tail. Next, I sewed together the top surface of the tail with the tail fins, side fins, and a piece of fleece for the bottom surface of the tail, leaving a seam open for turning later.
Next, I made the waist straps for the tail, although I had to make them a bit longer than in the Dino Tail tutorial. I sewed velcro to them and sewed them to the still inside-out tail, like in that tutorial. I then cut a triangle of fabric to be the butt end of the tail (instead of the circle used in the Dino Tail tutorial) and sewed this to the tail. Then I turned everything right side out, stuffed the tail with Poly-Fil, and closed the gap in the seam by hand with a ladder stitch.
I had planned to add diamonds of reflective silver fabric to the hoodie, but ran out of time.
For the full costume, just add a pair of black pants.
Links:
- Choly Knight's Toothless Hoodie sewing pattern hack
- Dino Tail tutorial
- Reflective Trim from Seattle Fabrics


